These are just some of the questions we get asked a lot of the time. Have a quick look to see if they apply to you.
Simplifying IT
1. Find “Email”
2. Enter email address
Tap the Menu key.
Tap Settings.
Tap Add account.
Key in your email address.
3. Enter password
4. Select server type
5. Enter username
6. Enter incoming server
7. Turn off encryption of incoming email
8. Enter incoming port
9. Turn deletion of email on server on or off
10. Enter outgoing server
11. Turn off encryption of outgoing email
12. Enter outgoing port
13. Turn off SMTP authentication
14. Select settings for retrieval of new email
15. Turn synchronisation of email on or off
16. Turn email notification on or off
17. Enter account name
18. Enter sender name
19. Finish setup
20. Return to the home screen
- From the Home screen, choose Settings.

- Next, tap Mail, Contacts, Calendars.
- In the Accounts section, tap Add Account.
- Choose your email account type. For setting up email to work with your (mt) Media Temple service, chooseOther.

- Select Add Mail Account under the Mail section.

- Enter your account information.
On the next screen, enter your DV account details.


- Incoming Mail Server
Host Name: mail.mt-example.com
User Name: john@mt-example.com
Password: If you do not know your password, you can reset it from the Plesk control panel. Please readthis article for detailed instructions. - Outgoing Mail Server (SMTP)
Host Name mail.mt-example.com
User Name: john@mt-example.com
Password: If you do not know your password, you can reset it from the Plesk control panel. Please this article for detailed instructions.
Once the email configuration is added, tap Next to continue.
- Choose what information you want to sync with your phone and tap Save to save the entered information. Your iPhone will then verify your account information.
- Upon successful completion, you will be taken back to the Mail screen. Your account will now be listed in the Accounts section.
Add your Exchange account
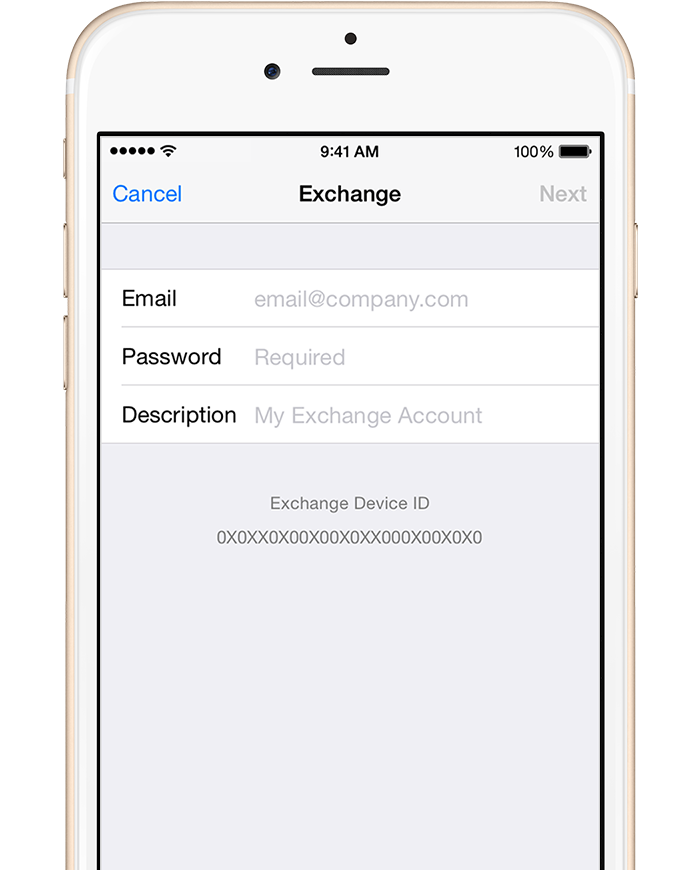
Tap Settings > Mail, Contacts, Calendars > Add Account > Exchange.
Enter your information
Enter your email address and password. If you want to, you can also enter an account description.

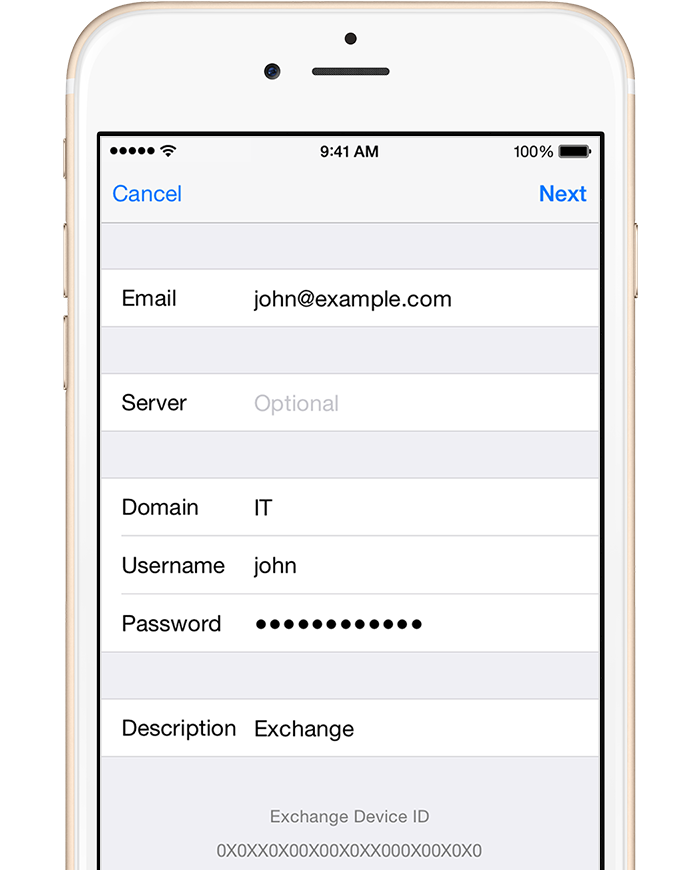
Connect to the Exchange Server
Your iOS device will try to find your Exchange Server. You might have to enter additional server information. If you need help, contact your Exchange Server administrator.

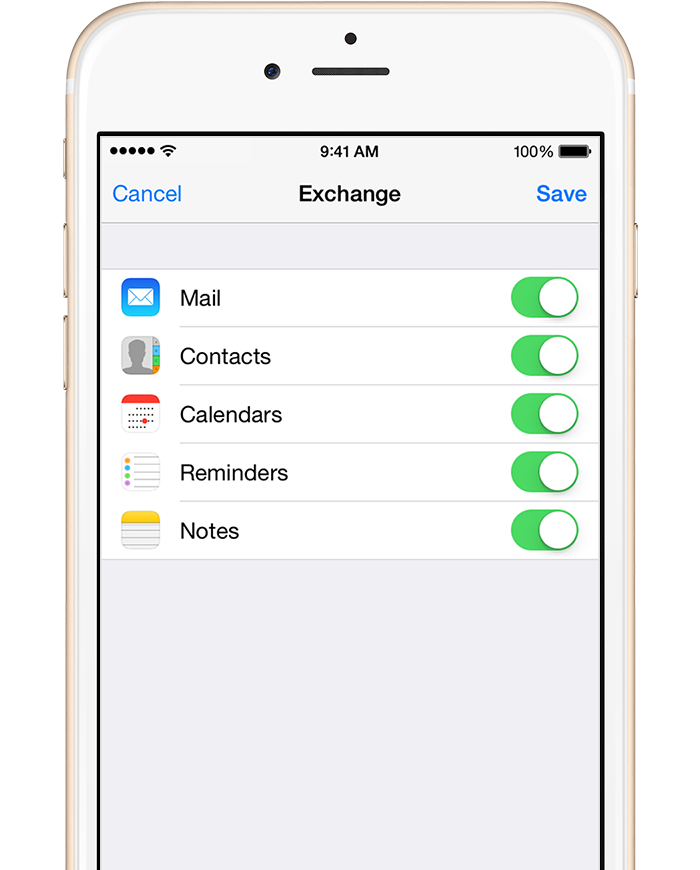
Sync your content
You can sync Mail, Contacts, Calendars, Reminders, and Notes. When you’re finished, tap Save.

Edit your Exchange settings
Tap Settings > Mail, Contacts, Calendars, select your Exchange account, and tap Account Info. You can also go here to set up automatic out-of-office replies and change how often you want Mail to sync (the default is 7 days).
Like Post Office Protocol 3 (POP3), the IMAP4 protocol uses port 25 Simple Mail Transfer Protocol (SMTP) to send messages, but an IMAP4 server uses port 143 to listen for messages.
Unlike POP3, IMAP4 allows you to store your messages by default on the server, instead of downloading them locally.
Use one of the following methods to configure Outlook as an IMAP4 client.
Method 1: Microsoft Office Outlook 2010
- Start Outlook.
- On the File menu, click Info and click Account Settings.
- Select Account Settings from the list.
- On the E-mail tab, click New and Select Email Account, and then click Next
- Click to select the Manually configure server settings or additional server types check box, and then click Next.
- Click Internet E-Mail, and then click Next.
- In the Server Information section, select IMAP for Account Type.
- In the Your Name box, enter your name exactly as you want it to appear to recipients.
- In the E-mail Address box, type your e-mail address.
- In the User Name box, type your account name.
- In the Password box, type your password.
- In the Incoming mail server box, type the name of your IMAP4 server.
- In the Outgoing mail server (SMTP) box, type the name of your SMTP server.Note IMAP4 is a retrieval protocol. You must have SMTP to send your messages.
- Click Next after you have completed entering this configuration information, and then click Finish.
Method 2: Microsoft Office Outlook 2007
- Start Outlook.
- On the Tools menu, click Account Settings.
- Click New.
- Click Microsoft Exchange, POP3, IMAP, or HTTP, and then click Next.
- In the Auto Account Setup dialog box, click to select the Manually configure server settings or additional server types check box, and then clickNext.
- Click Internet E-Mail, and then click Next.
- In the Server Information section, select IMAP for Account Type.
- In the Your Name box, enter your name exactly as you want it to appear to recipients.
- In the E-mail Address box, type your e-mail address.
- In the User Name box, type your account name.
- In the Password box, type your password.
- In the Incoming mail server box, type the name of your IMAP4 server.
- In the Outgoing mail server (SMTP) box, type the name of your SMTP server.Note IMAP4 is a retrieval protocol. You must have SMTP to send your messages.
- Click Next after you have completed entering this configuration information, and then click Finish.
Method 3: Microsoft Office Outlook 2003 and earlier versions of Outlook
- Start Outlook.
- On the Tools menu, click E-mail Accounts.
- Under E-mail Accounts, click Add a new e-mail account, and then click Next.
- Click IMAP as the type of account that you are creating, and then click Next.
- In the Your Name box, enter your name exactly as you would like it to appear to recipients.
- In the E-mail Address box, type your e-mail address.
- In the User Name box, type your account name.
- In the Password box, type your password.
- In the Incoming mail server (IMAP) box, type the name of your IMAP4 server.
- In the Outgoing mail server (SMTP) box, type the name of your SMTP server.NOTE: IMAP4 is a retrieval protocol. You need SMTP to send your messages.
- Click Next after you have completed entering this configuration information, and then click Finish.

