
POP Email Setup
Support Guide for Trison, ACET and Operation Specialists

Trison Business College

Australian College of Education and Training

Operation Specialists

TRISON
Outlook
1. Start the Microsoft Outlook program.
Use the Start menu to start Outlook 2016. If you’ve never used Outlook before, it will prompt you to create a new account. In that case, skip ahead to step 2.
If you’ve previously used Outlook and it doesn’t prompt you, click the File tab, then the Add Account button:
2. The “Auto Account Setup” window appears.
When this window appears, leave the spaces empty, choose the Manual setup or additional server types option, then click Next.
3. The “Choose Service” window appears.
Choose POP or IMAP, then click Next.
4. The “POP and IMAP Account Settings” window appears.
This is the window where you’ll enter most of your account settings. You want the window to look like this: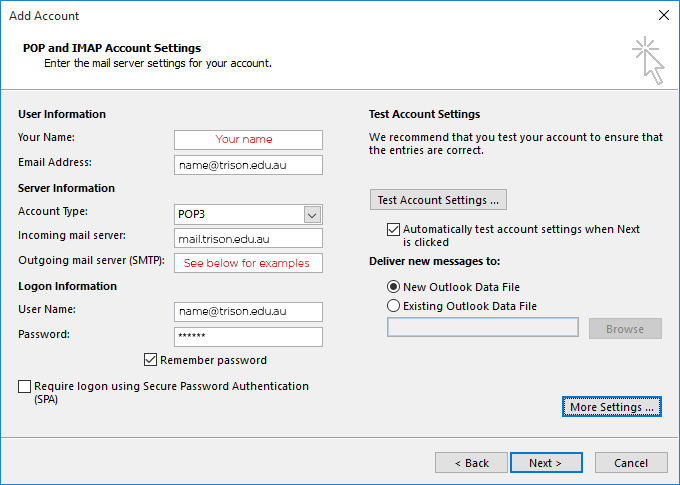
- “Your Name” is the name that other people will see when you send them e-mail. It should usually be your real name, such as Bill Gates or John Smith.
- Enter your “Email Address”. The address must be the e-mail address of the mailbox you created in your account management control panel.
- For “Account Type”, choose POP3.
- Enter mail.trison.edu.au for the “Incoming mail server”.
- Your “Outgoing mail server (SMTP)” details will depend on your ISP (internet service provider), eg Telstra (bigpond) or Optus (optusnet). Some examples are: mail.bigpond.com, mail.optusnet.com.au, smtp.vodafone.net.au. Check with your ISP or try an internet search to confirm.
- Enter your e-mail address again as the “User Name”. (The user name must be all lowercase).
- Type your e-mail password into the “Password” box. This is the password you chose for this e-mail address when you created the mailbox in your account management control panel. This password may be different from your master “My Account” password with our company.
- Make sure that “Require logon using Secure Password Authentication (SPA)” is not checked.
- Do not click “Test Account Settings” or “Next” yet; they will not work until you complete the next steps.
5. View “More Settings”.
Click the More Settings button. A new “Internet E-mail Settings” window appears.
6. Choose the “Outgoing Server” tab.
In the “Outgoing Server” tab, check My outgoing server (SMTP) requires authentication and make sure Use same settings as my incoming mail server is selected:
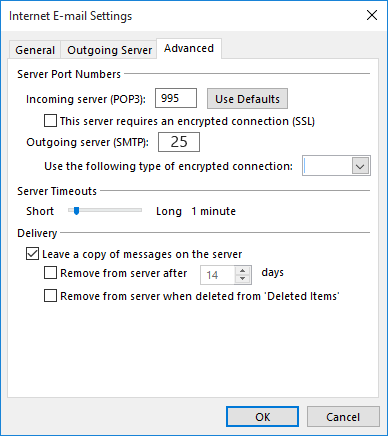
7. Choose the “Advanced” tab.
Click the “Advanced” tab, then:
- Keep the “Outgoing server (SMTP)” port number at “25”.
Those parts of the window should look like this:
8. Close the “Internet E-mail Settings” window.
Click OK to close the “Internet E-mail Settings” window. The “Add New Account” window will still be visible.
9. Test the settings.
Click Next. Outlook should tell you that “all tests completed successfully”:
If Outlook tells you a test failed, double-check to be sure you’ve entered the settings correctly.
10. Finish the wizard.
If the “Test Account Settings” window is still open, click Close to continue.
Click Finish to finish the wizard.
Outlook setup is complete
You’re finished! Try sending yourself a test e-mail message to make sure it works.
iOS
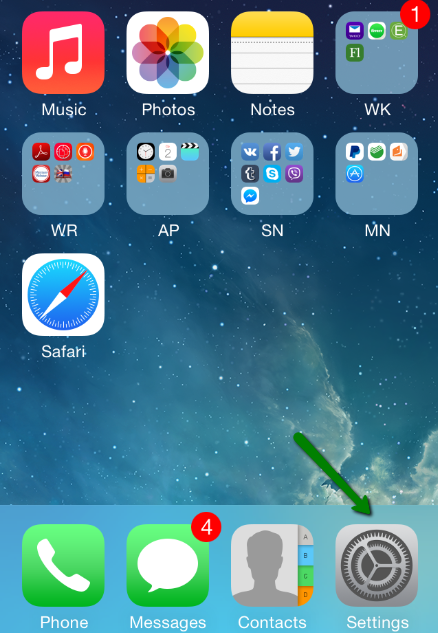
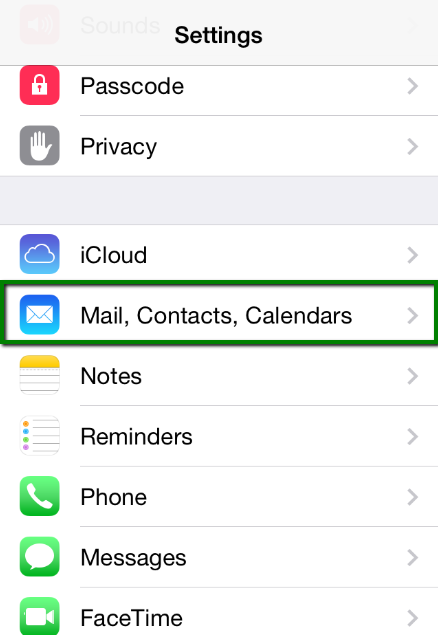
STEP 1: Open “Settings” and select “Mail, Contacts, Calendars”

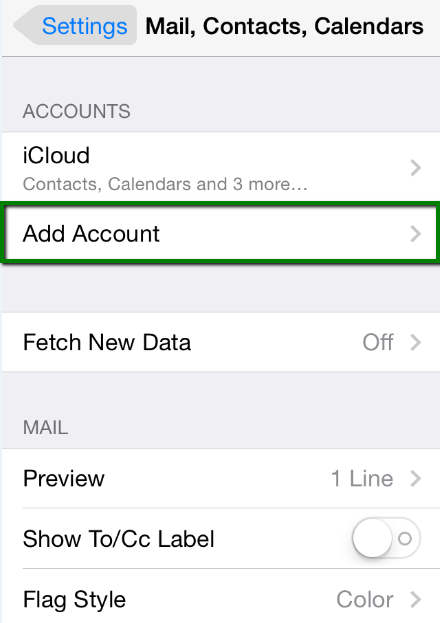
STEP 2: Click on “Add Account”

STEP 3: Click on “Other”

STEP 4: Click on “Add Mail Account” & enter details
**NOTE: Please put your name in the ‘name’ text-box and your email address in the ’email’ text-box**

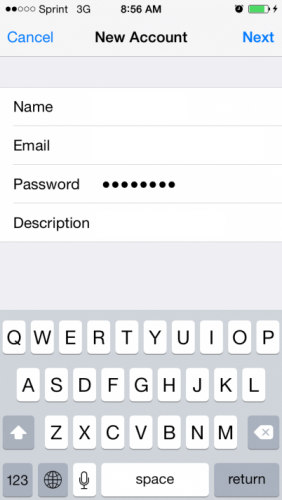
Name: Your name
Email:name@trison.edu.au
Password: The password for your email address
Description: Trison email
Enter the correct details, and then click “Next”
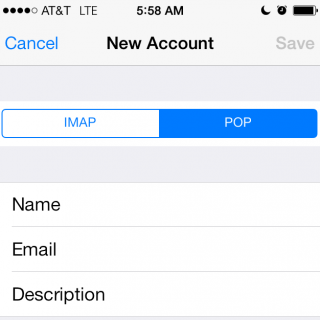
STEP 5: Account Type preference: POP.
STEP 6: Input server settings
**NOTE: Please put your name in the ‘name’ text-box and your email address in the ’email’ text-box**
Incoming Mail Server
Host Name: mail.trison.edu.au
User Name: name@trison.edu.au – your actual email address
Password: The password for your email address
Outgoing Mail Server (Your “Outgoing mail server (SMTP)” details will depend on your ISP (internet service provider), eg Telstra (bigpond) or Optus (optusnet). Some examples are: mail.bigpond.com, mail.optusnet.com.au, smtp.vodafone.net.au. Check with your ISP or try an internet search to confirm):
Host Name: mail.bigpond.com
User Name: name@trison.edu.au
Password: The password for your email address
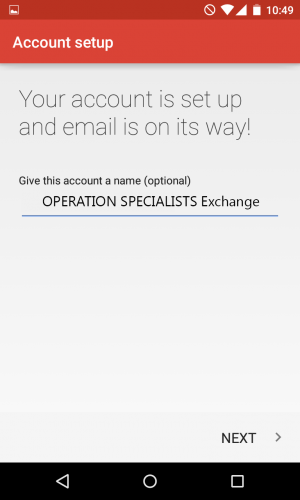
Step 7: Click “Next” & save
Android
If you’re setting up a POP account, only your email will sync to your device. Any calendar and contacts associated with that account remains stored on your local computer.

- From the Applications menu, select Email. This application may be named Mail on some versions of Android.
- Type your full email address, for example name@trison.edu.au, and your password, and then select Manual.

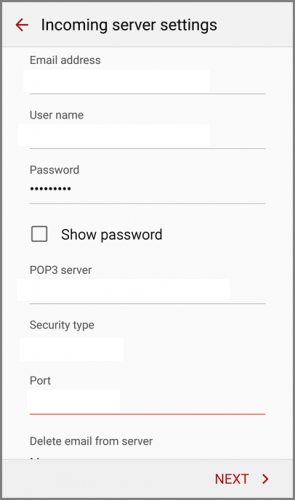
- Depending on the type of account you’re setting up, select POP3.
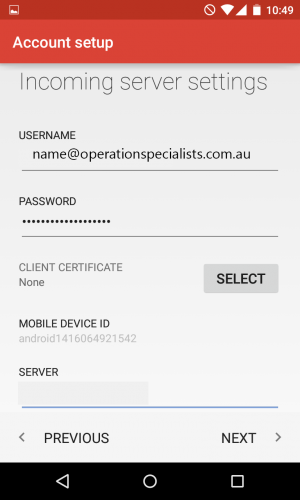
- On the Incoming server settings page, check that your email address is correct and add the following:Domain\Username
Type your full email address in this box, for example, ‘name@trison.edu.au’. If Domain and Username are separate text boxes in your version of Android, leave the Domain box empty, and type your full email address in the Username box.Password
Use the password that you use to access your account.
POP3 Server
Use the address of your server, ‘mail.trison.edu.au’.
Security type
Select your security type of ‘none’.
Port number
Add the port number. For example, 993. Tap Next.
If you receive a message about additional security features, select OK to continue.
- On the Outgoing Mail Server (Your “Outgoing mail server (SMTP)” details will depend on your ISP (internet service provider), eg Telstra (bigpond) or Optus (optusnet). Some examples are: mail.bigpond.com, mail.optusnet.com.au, smtp.vodafone.net.au. Check with your ISP or try an internet search to confirm), add the following:
- SMTP server
Type your SMTP server name. For example ‘mail.bigpond.com’. - Security type
Select your security type of ‘none’. - Port number
Add your port number. For example, 25. Tap Next.
- SMTP server

- In Account name type a name for this account and the name you want displayed when you send e-mail to others.
- Tap Done.
TIP: You may need to wait ten-to-fifteen minutes after you set up your account before you can send or receive email.
Exchange Email Setup
Outlook
To set up Outlook 2016:
- Navigate to Windows Control Panel > Mail > Show Profiles > Add. Specify your Profile Name and click OK.

- On the Auto Account Setup page type your name, primary email address, and your mailbox password twice, then click Next.

- Outlook 2016 will start configuring your account. When you get a security prompt, check the box Don’t ask me about this website again and then click Allow.

- Windows Security window might then prompt your username and password. Enter your primary email address in the Username box and type your mailbox password and click OK.

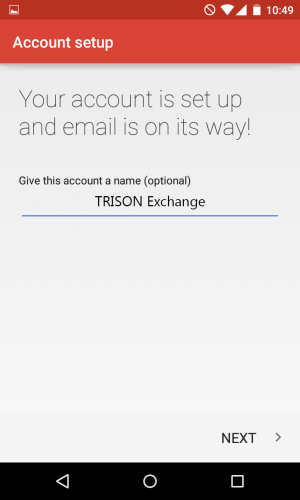
- Outlook 2016 will discover your email server settings and finish configuration of your email account. Once you see all steps as completed, you can click Finish. Now you can open your new profile in Outlook 2016.

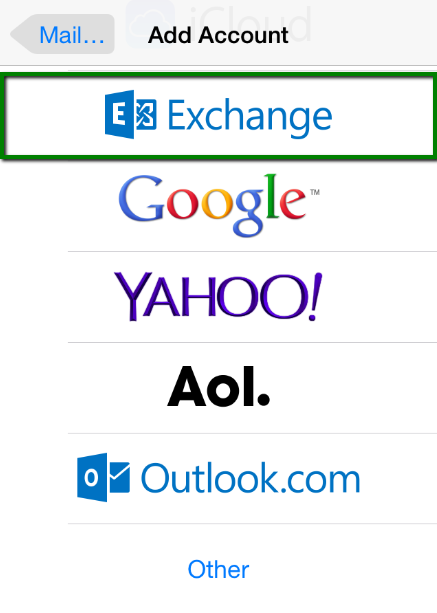
iOS
1. Go to your device’s Settings:
2. Select Mail, Contacts, Calendars and choose Add Account option:
3. From listed options, select Exchange:
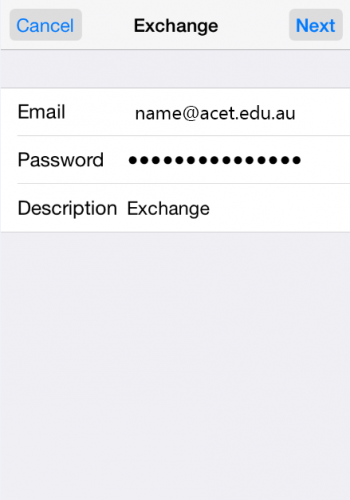
4. Now you need to enter your full email address, server name, exchange username then enter your account password:

Email: your full email address
Password: email password
Description: any description you like to use for this account
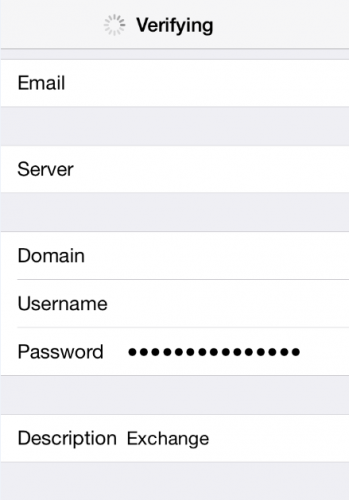
5. System will verify your account’s settings:
Here you can check and edit settings as well.
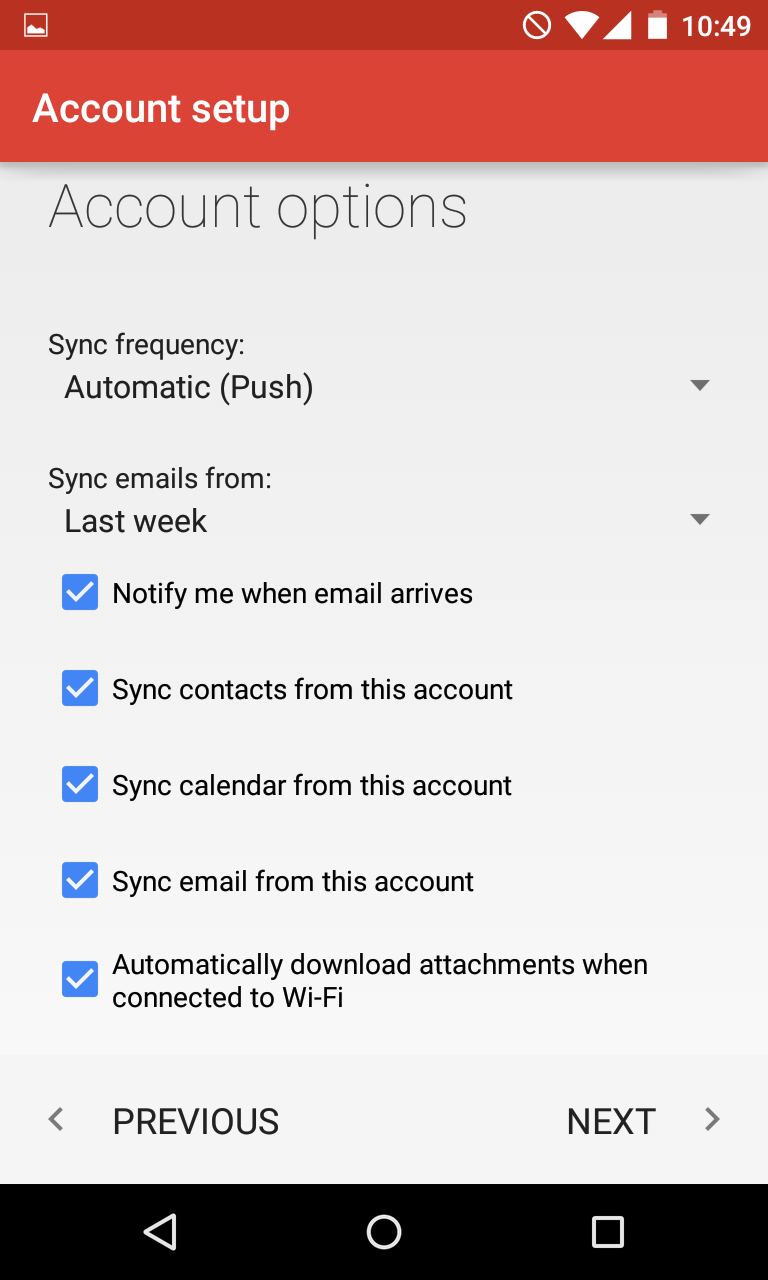
6. Once account is created, you will be able to choose additional settings of the exchange account.
It is possible to enable synchronization for the following services:
- Contacts
- Calendars
- Reminders

Below you can find the list of the supported features available for iPhone.
Supported:
- Calendar
- Address book
- Tasks
- Email via Exchange ActiveSync
- Replying to invitations via email client for third party users (external participants)
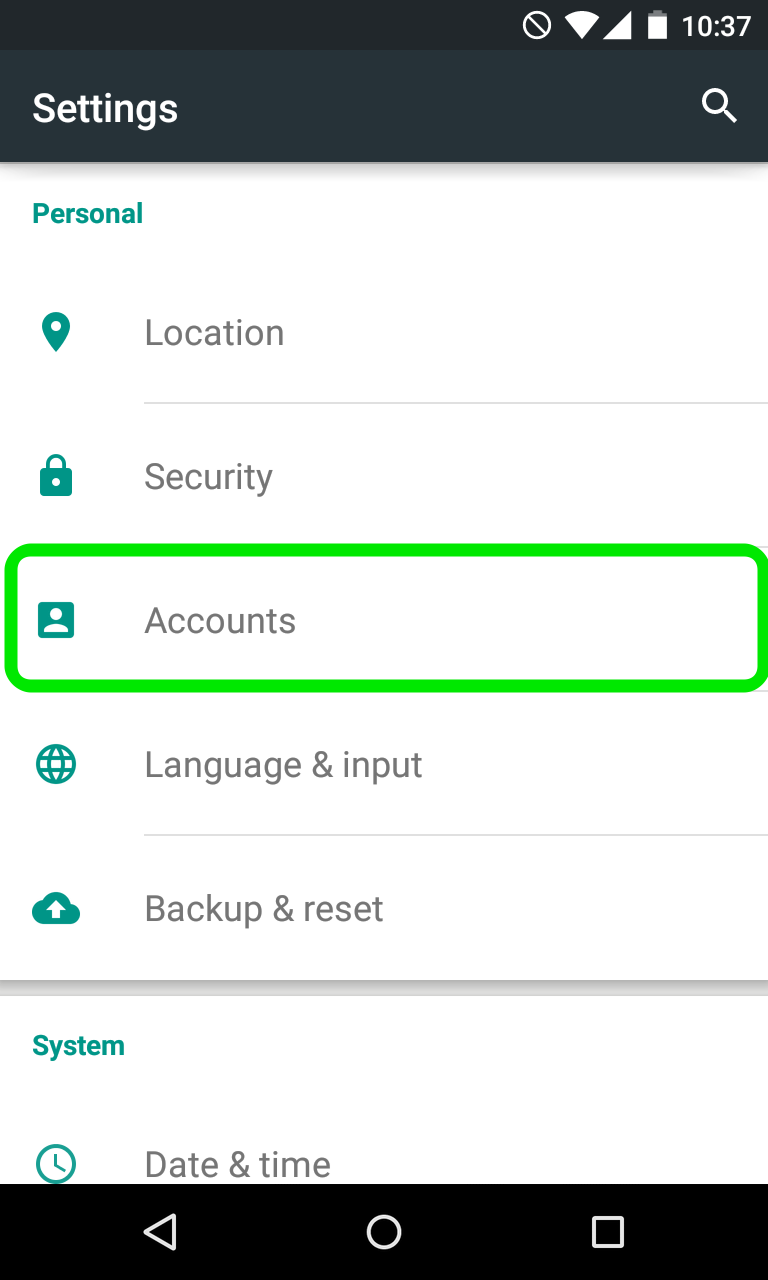
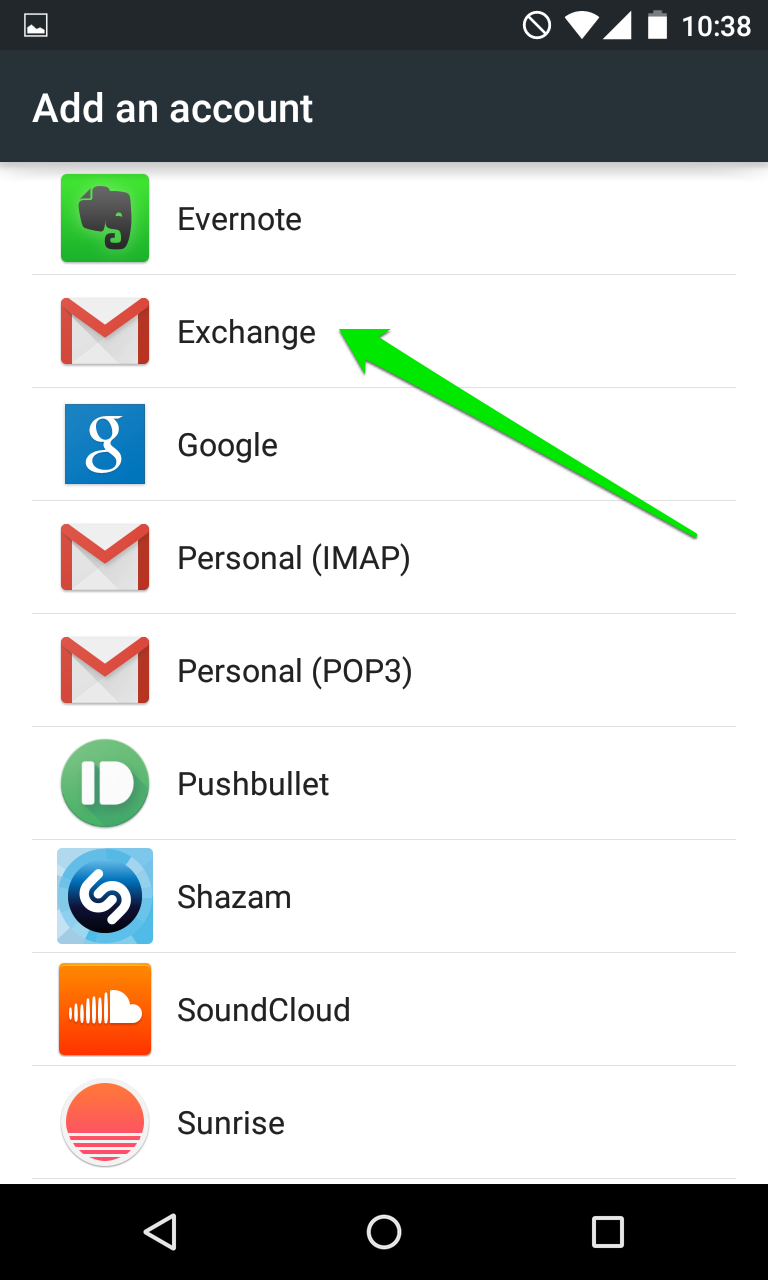
Android
1. To begin, open your Android device Settings and tap Accounts menu:
2. Scroll down the screen and tap Add Account option:

3. On the next screen choose Exchange option:
4. The next screen will prompt you to enter your email address.
Make sure to type in full Private Email address:
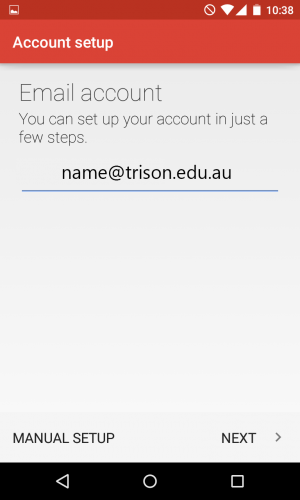
5. Once done, tap Next to proceed to the next step.
Here you will need to indicate your email account password.

6. Once ready, tap Next. Here you will need to indicate correct Exchange server settings.
Make sure to use the following settings for your account:
Username: full email address
Password: password for this mailbox
Server: trison.edu.au
Port: 443
Security Type: SSL/TLS (Accept All Certificates)

7. After all the settings are correctly indicated, simply tap Next to verify the settings and proceed to account setup completion:

ACET
POP Email Setup
Outlook
1. Start the Microsoft Outlook program.
Use the Start menu to start Outlook 2016. If you’ve never used Outlook before, it will prompt you to create a new account. In that case, skip ahead to step 2.
If you’ve previously used Outlook and it doesn’t prompt you, click the File tab, then the Add Account button:
2. The “Auto Account Setup” window appears.
When this window appears, leave the spaces empty, choose the Manual setup or additional server types option, then click Next.
3. The “Choose Service” window appears.
Choose POP or IMAP, then click Next.
4. The “POP and IMAP Account Settings” window appears.
This is the window where you’ll enter most of your account settings. You want the window to look like this:
- “Your Name” is the name that other people will see when you send them e-mail. It should usually be your real name, such as Bill Gates or John Smith.
- Enter your “Email Address”. The address must be the e-mail address of the mailbox you created in your account management control panel.
- For “Account Type”, choose POP3.
- Enter mail.acet.edu.au for the “Incoming mail server”.
- Your “Outgoing mail server (SMTP)” details will depend on your ISP (internet service provider), eg Telstra (bigpond) or Optus (optusnet). Some examples are: mail.bigpond.com, mail.optusnet.com.au, smtp.vodafone.net.au. Check with your ISP or try an internet search to confirm.
- Enter your e-mail address again as the “User Name”. (The user name must be all lowercase).
- Type your e-mail password into the “Password” box. This is the password you chose for this e-mail address when you created the mailbox in your account management control panel. This password may be different from your master “My Account” password with our company.
- Make sure that “Require logon using Secure Password Authentication (SPA)” is not checked.
- Do not click “Test Account Settings” or “Next” yet; they will not work until you complete the next steps.
5. View “More Settings”.
Click the More Settings button. A new “Internet E-mail Settings” window appears.
6. Choose the “Outgoing Server” tab.
In the “Outgoing Server” tab, check My outgoing server (SMTP) requires authentication and make sure Use same settings as my incoming mail server is selected:
7. Choose the “Advanced” tab.
Click the “Advanced” tab, then:
- Keep the “Outgoing server (SMTP)” port number at “25”.
Those parts of the window should look like this:
8. Close the “Internet E-mail Settings” window.
Click OK to close the “Internet E-mail Settings” window. The “Add New Account” window will still be visible.
9. Test the settings.
Click Next. Outlook should tell you that “all tests completed successfully”:
If Outlook tells you a test failed, double-check to be sure you’ve entered the settings correctly.
10. Finish the wizard.
If the “Test Account Settings” window is still open, click Close to continue.
Click Finish to finish the wizard.
Outlook setup is complete
You’re finished! Try sending yourself a test e-mail message to make sure it works.
iOS
STEP 1: Open “Settings” and select “Mail, Contacts, Calendars”
STEP 2: Click on “Add Account”
STEP 3: Click on “Other”
STEP 4: Click on “Add Mail Account” & enter details
**NOTE: Please put your name in the ‘name’ text-box and your email address in the ’email’ text-box**
Name: Your name
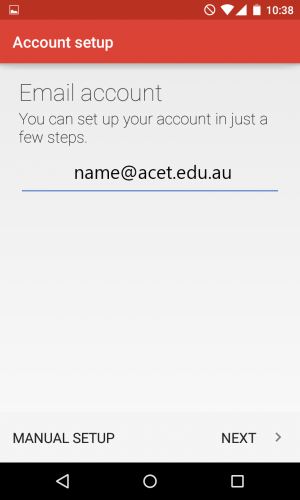
Email: name@acet.edu.au
Password: The password for your email address
Description: ACET email
Enter the correct details, and then click “Next”
STEP 5: Account Type preference: POP.
STEP 6: Input server settings
**NOTE: Please put your name in the ‘name’ text-box and your email address in the ’email’ text-box**
Incoming Mail Server
Host Name: mail.acet.edu.au
User Name: name@acet.edu.au – your actual email address
Password: The password for your email address
Outgoing Mail Server (Your “Outgoing mail server (SMTP)” details will depend on your ISP (internet service provider), eg Telstra (bigpond) or Optus (optusnet). Some examples are: mail.bigpond.com, mail.optusnet.com.au, smtp.vodafone.net.au. Check with your ISP or try an internet search to confirm):
Host Name: mail.bigpond.com
User Name: name@acet.edu.au
Password: The password for your email address
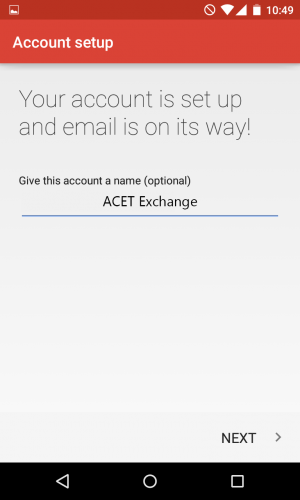
Step 7: Click “Next” & save
Android
If you’re setting up a POP account, only your email will sync to your device. Any calendar and contacts associated with that account remains stored on your local computer.
- From the Applications menu, select Email. This application may be named Mail on some versions of Android.
- Type your full email address, for example name@acet.edu.au, and your password, and then select Manual.
- Depending on the type of account you’re setting up, select POP3.
- On the Incoming server settings page, check that your email address is correct and add the following:Domain\Username
Type your full email address in this box, for example, ‘name@acet.edu.au’. If Domain and Username are separate text boxes in your version of Android, leave the Domain box empty, and type your full email address in the Username box.Password
Use the password that you use to access your account.
POP3 Server
Use the address of your server, ‘mail.acet.edu.au’.
Security type
Select your security type of ‘none’.
Port number
Add the port number. For example, 993. Tap Next.
If you receive a message about additional security features, select OK to continue.
- On the Outgoing Mail Server (Your “Outgoing mail server (SMTP)” details will depend on your ISP (internet service provider), eg Telstra (bigpond) or Optus (optusnet). Some examples are: mail.bigpond.com, mail.optusnet.com.au, smtp.vodafone.net.au. Check with your ISP or try an internet search to confirm), add the following:
- SMTP server
Type your SMTP server name. For example ‘mail.bigpond.com’. - Security type
Select your security type of ‘none’. - Port number
Add your port number. For example, 25. Tap Next.
- SMTP server
- In Account name type a name for this account and the name you want displayed when you send e-mail to others.
- Tap Done.
TIP: You may need to wait ten-to-fifteen minutes after you set up your account before you can send or receive email.
Exchange Email Setup
Outlook
To set up Outlook 2016:
- Navigate to Windows Control Panel > Mail > Show Profiles > Add. Specify your Profile Name and click OK.
- On the Auto Account Setup page type your name, primary email address, and your mailbox password twice, then click Next.
- Outlook 2016 will start configuring your account. When you get a security prompt, check the box Don’t ask me about this website again and then click Allow.
- Windows Security window might then prompt your username and password. Enter your primary email address in the Username box and type your mailbox password and click OK.
- Outlook 2016 will discover your email server settings and finish configuration of your email account. Once you see all steps as completed, you can click Finish. Now you can open your new profile in Outlook 2016.
iOS
1. Go to your device’s Settings:
2. Select Mail, Contacts, Calendars and choose Add Account option:
3. From listed options, select Exchange:
4. Now you need to enter your full email address, server name, exchange username then enter your account password:
Email: your full email address (name@acet.edu.au)
Password: one from your email account
Description: any description you like to use for this account
5. System will verify your account’s settings:
Here you can check and edit settings as well.
6. Once account is created, you will be able to choose additional settings of the exchange account.
It is possible to enable synchronization for the following services:
- Contacts
- Calendars
- Reminders
Below you can find the list of the supported features available for iPhone.
Supported:
- Calendar
- Address book
- Tasks
- Email via Exchange ActiveSync
- Replying to invitations via email client for third party users (external participants)
Android
1. To begin, open your Android device Settings and tap Accounts menu:
2. Scroll down the screen and tap Add Account option:
3. On the next screen choose Exchange option:
4. The next screen will prompt you to enter your email address.
Make sure to type in full Private Email address:
5. Once done, tap Next to proceed to the next step.
Here you will need to indicate your email account password.
6. Once ready, tap Next. Here you will need to indicate correct Exchange server settings.
Make sure to use the following settings for your account:
Username: full email address
Password: password for this mailbox
Server: acet.edu.au
Port: 443
Security Type: SSL/TLS (Accept All Certificates)

7. After all the settings are correctly indicated, simply tap Next to verify the settings and proceed to account setup completion:

OPERATION SPECIALISTS
POP Email Setup
Outlook
1. Start the Microsoft Outlook program.
Use the Start menu to start Outlook 2016. If you’ve never used Outlook before, it will prompt you to create a new account. In that case, skip ahead to step 2.
If you’ve previously used Outlook and it doesn’t prompt you, click the File tab, then the Add Account button:
2. The “Auto Account Setup” window appears.
When this window appears, leave the spaces empty, choose the Manual setup or additional server types option, then click Next.
3. The “Choose Service” window appears.
Choose POP or IMAP, then click Next.
4. The “POP and IMAP Account Settings” window appears.
This is the window where you’ll enter most of your account settings. You want the window to look like this:
- “Your Name” is the name that other people will see when you send them e-mail. It should usually be your real name, such as Bill Gates or John Smith.
- Enter your “Email Address”. The address must be the e-mail address of the mailbox you created in your account management control panel.
- For “Account Type”, choose POP3.
- Enter mail.operationspecialists.com.au for the “Incoming mail server”.
- Your “Outgoing mail server (SMTP)” details will depend on your ISP (internet service provider), eg Telstra (bigpond) or Optus (optusnet). Some examples are: mail.bigpond.com, mail.optusnet.com.au, smtp.vodafone.net.au. Check with your ISP or try an internet search to confirm.
- Enter your e-mail address again as the “User Name”. (The user name must be all lowercase).
- Type your e-mail password into the “Password” box. This is the password you chose for this e-mail address when you created the mailbox in your account management control panel. This password may be different from your master “My Account” password with our company.
- Make sure that “Require logon using Secure Password Authentication (SPA)” is not checked.
- Do not click “Test Account Settings” or “Next” yet; they will not work until you complete the next steps.
5. View “More Settings”.
Click the More Settings button. A new “Internet E-mail Settings” window appears.
6. Choose the “Outgoing Server” tab.
In the “Outgoing Server” tab, check My outgoing server (SMTP) requires authentication and make sure Use same settings as my incoming mail server is selected:
7. Choose the “Advanced” tab.
Click the “Advanced” tab, then:
- Keep the “Outgoing server (SMTP)” port number at “25”.
Those parts of the window should look like this:
8. Close the “Internet E-mail Settings” window.
Click OK to close the “Internet E-mail Settings” window. The “Add New Account” window will still be visible.
9. Test the settings.
Click Next. Outlook should tell you that “all tests completed successfully”:
If Outlook tells you a test failed, double-check to be sure you’ve entered the settings correctly.
10. Finish the wizard.
If the “Test Account Settings” window is still open, click Close to continue.
Click Finish to finish the wizard.
Outlook setup is complete
You’re finished! Try sending yourself a test e-mail message to make sure it works.
iOS
STEP 1: Open “Settings” and select “Mail, Contacts, Calendars”
STEP 2: Click on “Add Account”
STEP 3: Click on “Other”
STEP 4: Click on “Add Mail Account” & enter details
**NOTE: Please put your name in the ‘name’ text-box and your email address in the ’email’ text-box**
Name: Your name
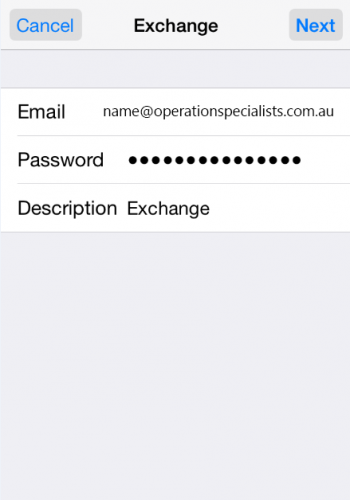
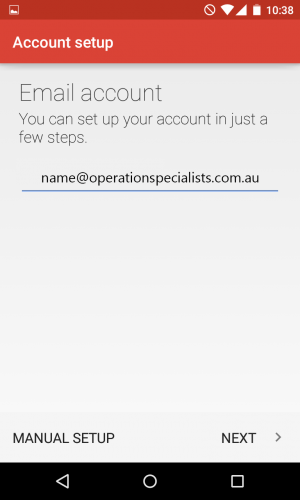
Email: name@operationspecialists.com.au
Password: The password for your email address
Description: Operation Specialists email
Enter the correct details, and then click “Next”
STEP 5: Account Type preference: POP.
STEP 6: Input server settings
**NOTE: Please put your name in the ‘name’ text-box and your email address in the ’email’ text-box**
Incoming Mail Server
Host Name: operationspecialists.com.au
User Name: name@operationspecialists.com.au – your actual email address
Password: The password for your email address
Outgoing Mail Server (Your “Outgoing mail server (SMTP)” details will depend on your ISP (internet service provider), eg Telstra (bigpond) or Optus (optusnet). Some examples are: mail.bigpond.com, mail.optusnet.com.au, smtp.vodafone.net.au. Check with your ISP or try an internet search to confirm):
Host Name: mail.bigpond.com
User Name: name@operationspecialists.com.au
Password: The password for your email address
Step 7: Click “Next” & save
Android
If you’re setting up a POP account, only your email will sync to your device. Any calendar and contacts associated with that account remains stored on your local computer.
- From the Applications menu, select Email. This application may be named Mail on some versions of Android.
- Type your full email address, for example name@operationspecialists.com.au, and your password, and then select Manual.
- Depending on the type of account you’re setting up, select POP3.
- On the Incoming server settings page, check that your email address is correct and add the following:Domain\Username
Type your full email address in this box, for example, ‘name@operationspecialists.com.au’. If Domain and Username are separate text boxes in your version of Android, leave the Domain box empty, and type your full email address in the Username box. Password
Use the password that you use to access your account.
POP3 Server
Use the address of your server, ‘name@operationspecialists.com.au’.
Security type
Select your security type of ‘none’.
Port number
Add the port number. For example, 993. Tap Next.
If you receive a message about additional security features, select OK to continue.
- On the Outgoing Mail Server (Your “Outgoing mail server (SMTP)” details will depend on your ISP (internet service provider), eg Telstra (bigpond) or Optus (optusnet). Some examples are: mail.bigpond.com, mail.optusnet.com.au, smtp.vodafone.net.au. Check with your ISP or try an internet search to confirm), add the following:
- SMTP server
Type your SMTP server name. For example ‘mail.bigpond.com’. - Security type
Select your security type of ‘none’. - Port number
Add your port number. For example, 25. Tap Next.
- SMTP server
- In Account name type a name for this account and the name you want displayed when you send e-mail to others.
- Tap Done.
TIP: You may need to wait ten-to-fifteen minutes after you set up your account before you can send or receive email.
Exchange Email Setup
Outlook
To set up Outlook 2016:
- Navigate to Windows Control Panel > Mail > Show Profiles > Add. Specify your Profile Name and click OK.
- On the Auto Account Setup page type your name, primary email address, and your mailbox password twice, then click Next.
- Outlook 2016 will start configuring your account. When you get a security prompt, check the box Don’t ask me about this website again and then click Allow.
- Windows Security window might then prompt your username and password. Enter your primary email address in the Username box and type your mailbox password and click OK.
- Outlook 2016 will discover your email server settings and finish configuration of your email account. Once you see all steps as completed, you can click Finish. Now you can open your new profile in Outlook 2016.
iOS
1. Go to your device’s Settings:
2. Select Mail, Contacts, Calendars and choose Add Account option:
3. From listed options, select Exchange:
4. Now you need to enter your full email address, server name, exchange username then enter your account password:
Email: your full email address (name@operationspecialists.com.au)
Server:
Password: one from your email account
Description: any description you like to use for this account
5. System will verify your account’s settings:
Here you can check and edit settings as well.
6. Once account is created, you will be able to choose additional settings of the exchange account.
It is possible to enable synchronization for the following services:
- Contacts
- Calendars
- Reminders
Below you can find the list of the supported features available for iPhone.
Supported:
- Calendar
- Address book
- Tasks
- Email via Exchange ActiveSync
- Replying to invitations via email client for third party users (external participants)
Android
1. To begin, open your Android device Settings and tap Accounts menu:
2. Scroll down the screen and tap Add Account option:
3. On the next screen choose Exchange option:
4. The next screen will prompt you to enter your email address.
Make sure to type in full Private Email address:
5. Once done, tap Next to proceed to the next step.
Here you will need to indicate your email account password.
6. Once ready, tap Next. Here you will need to indicate correct Exchange server settings.
Make sure to use the following settings for your account:
Username: full email address
Password: password for this mailbox
Server:
Port: 443
Security Type: SSL/TLS (Accept All Certificates)
7. After all the settings are correctly indicated, simply tap Next to verify the settings and proceed to account setup completion:
Upload files to OneDrive
Using the OneDrive website
Depending on the web browser you use, you can upload files up to 10 GB in size.
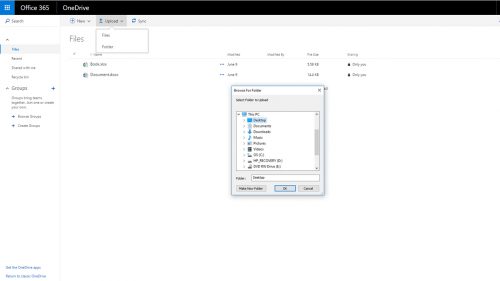
- On the OneDrive website sign in with your Microsoft account, and then browse to the location where you want to add the files.


- Select Upload.

- Select the files you want to upload, and then select Open.
- You can also edit files uploaded to OneDrive from within the browser. Online versions of Office make creating and editing files easy and quick, then once you finish with them you can share across the organisation from the panel on the left.


TIPS:
- You can also drag files from File Explorer straight to your files on the OneDrive website.
- In the Google Chrome or Microsoft Edge browser, you can also upload folders from the Folder option on the Upload menu, or drag folders to the website.
- Learn ways to organize and find photos in OneDrive.
NOTES:
- Microsoft might limit the number of files that you can upload to OneDrive each month.
- Please respect copyright and be careful what you share online. Copying or sharing unauthorized materials violates the Microsoft Services Agreement.
Need more help?
Get help by emailing the OneDrive support team. In a OneDrive mobile app, shake the device to get help or share feedback on OneDrive.
Get started with SharePoint
When you sign in to Office 365, or your organization’s corporate intranet site, you’ll see links to Newsfeed, OneDrive, and Sites in the app launcher navigation. These are your entry points into SharePoint.
Organizations use SharePoint to create websites. You can use it as a secure place to store, organize, share, and access information from almost any device. All you need is a web browser, such as Internet Explorer, Google Chrome, or Mozilla Firefox.
- Newsfeed Stay tuned into conversations among your coworkers, and updates about their activities. Get started with Newsfeed.
NOTE: If your organization uses Yammer for its enterprise social network, then you may see a link to Yammer instead of Newsfeed. Learn more about Yammer.
- OneDrive for Business Your own place to keep work documents and other files. When you store your files on OneDrive for Business only you can see them, but you can easily share them with coworkers and access them from your mobile device. Get started with OneDrive for Business.
- Sites Easily find and access sites you’re following, and quickly create new team sites. Learn more about following sites and creating sites.
- Settings Where you’ll find additional site actions for customizing your SharePoint sites.
10 things you can do with SharePoint, right now
SharePoint is powerful. There’s so much you can do with it. If you master a couple of these basic tasks, you’ll be well on your way to becoming an expert.
| To do this… | Try this… |
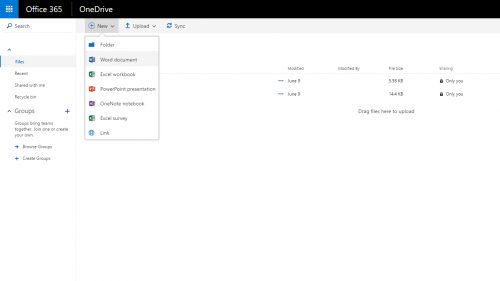
| Upload files to OneDrive for Business, your online document library, so you can access them from anywhere | Click OneDrive > Upload.
Or you can drag files from your computer onto your OneDrive for Business page. See Upload files to a library. (In SharePoint 2013, click New document > Upload existing file.) |
| Open a document in a document library | Click to open the document you want to work on and it will open in Office Online. If you have the application installed on your computer and want to use it, clickEdit Document > Edit in <application name>. |
| Work with others on the same document, at the same time | In a document library, click to open the document you want to work on. It will open in Office Online. The number of people currently editing the document appears at the bottom of the document. |
| Share documents | Select the document you want to share, click the ellipses … to open the menu, and then click Share.
See Video: Share documents in Office 365 or Video: Share documents in SharePoint Server 2013. |
| Share sites | If you have site owner permissions, click Sites, choose the site you want to share, and then click Share.
See Share sites or documents with people outside your organization (SharePoint Online only). |
| Create a team site | If you have site owner permissions, click Sites > new site.
See Create a site. |
| Add a list or library to your team site | On the site that you want to add the list or library, go to Settings > Add an app.
See Add an app to a site. |
| Keep previous versions of a document while you make changes to it | Select the document, on the Files tab, click Version History. |
| Search for something | Type a search keyword into the Search this site box, click the down arrow to elect a search scope, and then click the Search icon. |
| Share information with your entire organization | Click Newsfeed, type your message, and then click Post. |
Ready to move beyond the basics?
Take a look at our beginner and intermediate SharePoint training to learn more about:
- Creating and managing a blog to share information
- Creating and setting up a list
- Sharing documents
- Using a list
- Syncing libraries using OneDrive for Business
- Updating profile and privacy settings